


A guide to growing great garlic
There are three main factors in growing the best garlic.
1. Plant it in the fall/autumn
2. Pick the best garlic to grow in your area
3. Make sure you prepare the bed well.
Garlic is like daffodils you plant it in the fall. Its important that the bulbs put down roots over the winter and create good shoots in the spring which makes for larger bulbs. You don't want to plant too early and have the bulbs create much in the way of above ground shoots before the winter comes as they can get damaged by the cold weather and not perform as well in the spring. Used to be that it was easy to plant garlic the weather was reliable and October was a good month for us in zone 6a. Now with global warming its not as easy to decide our zone has been changed to 6b. In recent years I have kept moving our planting dates back further and further. First it was Thanksgiving, in 2019 it was second week of December, and still it was warm enough for shoots to grow and get damaged when the cold finally came ruining a lot of my soft neck garlic. Its hard to determine these days. The best advise is plant as late as you can but not so late that the ground freezes before the bulbs have time to establish roots. Then hope it stays cool afterwards and you don't get too much top growth.
Selecting the best garlic to grow in your garden.
The best way to do this is to see what the local farm markets and CSA's are growing. garlic will adapt to the ground that its growing in so while a particular variety may grow wonderfully in Michigan it may do very poorly in New York or Virginia. The reverse is also true. So picking something from a catalog that is grown a long way from your location is not the best way to find the greatest garlic for you. Find a local supplier or buy it at the local market. Ask first if the farmer has grown the garlic themselves and not imported it. Ask also what variety it is. There are literally dozens of them and they will vary by region of the country. If outside the US the varieties you have will be different again. the answer is always the same find something that grows well locally.
Get as local as you can.
Soil types vary even over short distances, so while you may have say thick clay soil five miles down the road it might be gravelly with some loam in it. Garlic grown there wont grow well in your soil. If in doubt get several different varieties and try them all. Find out what does best in your garden and grow that. If possible grow two or more different ones, this way if one fails due to climatic conditions the others may survive. Our best variety was obtained from a CSA less than three miles from our own farm.
GARLIC IS A STRANGE PLANT.
It takes THREE YEARS to adapt to your soil so although you might start with nice fat cloves in the first even the second year, it may start to dwindle over time to something small and disappointing if you don't have a variety that does well in your area. The opposite can also be true. Something that did poorly for others may fatten up and be wonderful in your soil. This is another important reason to buy from a local grower that has already had success in your area with a particular variety.
Always buy organic garlic if you can. It is not recommended that you try growing supermarket garlic, most of this comes from China and has been irradiated before sale. It rarely produces a good crop.
WHAT KIND OF GARLIC DO YOU PLANT?
There are basically two kinds of garlic, soft neck and hard neck. This refers to the stalks that come out the top of the garlic, some are soft and flop over when its growing, some are hard and grow tall. These descriptions are general and while accurate in most cases there will always be exceptions.
Soft neck garlic is often used more in Italian dishes and has a different flavour. It's the kind most used in roasting as the cloves don't usually turn to mush as hard necks do. Blubs are often more 'open' more like a rose while hard necks are more closed in the papery shell.
Hard neck garlic produces tall upright stems that can be quite thick depending on the variety. The bulbs can be larger and stronger in flavor. However bigger is not always better. Some smaller cloves are much more strongly flavored than larger ones. Jumbo garlic may grow big but its has a pretty mild flavour.
PICKING A GARLIC VARIETY.
There are two important factors when picking a variety.
1. Do you like how it tastes? If not then its pointless growing
it.
2. Will it grow well for you? No matter how much you like something
if it wont grow well for you its again pointless.
Make sure you taste the garlic before you plant any. If you have never grown your own garlic before and have relied on Insipid supermarket stuff be prepared. Organic garlic is STRONG it has BITE, sometimes it can make your eyes water. Don't use too much organic garlic in a dish until you are sure you know what you are doing or you will overwhelm it.
Check around your area. You may be lucky and find a garlic festival. There are several held around the country. We were fortunate to discover a magnificent one in the Hudson Valley of New York. Its a weekend trip for us but its a true joy to attend. There are dozens of stalls piled high with all kinds of different garlic. Each offers little garlic pieces for you to try out. Its a great way to discover new varieties and see what they taste like. Don't worry about having garlic breath, everyone there is doing the same. If you cant find a festival check out the local farm markets buy a little of each don't forget to ask what variety it is. Some markets only grow one kind others may offer several different ones.
We recommend you try at least 3 or more different varieties and see which does best for you and which tastes the best. Its also a good idea to have some hard and some soft neck garlic varieties its possible some will do much better in your soil than others.
The taste of the garlic will also depend on your soil type and how well you have prepared your garlic bed before planting. So be prepared when you taste your own, it may not be the same as the cloves you planted. It might be milder or it may be much stronger.
ANATOMY OF A GARLIC BULB.
Lets get our terminology right before we go any further. When you buy
garlic you buy a garlic blub. The bulb is made up of lots of cloves. That
the individual bits that you use when cooking and what you are going to
plant.
KEEPING YOUR GARLIC UNTIL PLANTING.
So you have bought your garlic ready to plant. Keep it in the refrigerator in a paper bag - NOT plastic - until you are ready to plant it. Keep it in full bulbs DO NOT split it up into individual cloves until just before you are ready to plant it.
ON PLANTING DAY.
Only after the garlic bed has been
prepared and you are ready to plant your garlic, do you split up the bulbs
into individual cloves. Sit down and carefully pull apart the cloves from the
blub. Pick only the largest fattest cloves for planting. If there are any small
ones put those aside to use in the kitchen. Don't plant tiny cloves.
Its tempting to use the little ones to plant and keep the big fat ones
to eat, however you get back what you plant. If you put in a tiny clove
you will get back a poor harvest. If you use a big fat clove to plant
it is more likely to create a big fat bulb in return. Don't be tempted
to use small ones it wont be worth your while growing it.
Make sure that the cloves are split up individually. Don't leave any stuck together, but try to keep the papery outer wrapping of each clove intact. This helps the clove when its growing. If you get two cloves that are stuck together inside the wrapper then put those aside. They never grow as well and can produce strange deformed bulbs that are more prone to disease attack.
Put all the cloves of one variety into a container. I like to use yogurt pots. If you are growing more than one variety make sure you have labels for them to mark where each variety is going to start and stop. Make sure you use good sturdy markers as its easy for them to get pulled out of the ground, blown away in a strong wind, or disturbed by wildlife. If this happens you loose where your varieties are. This happened to me one year, someone pulled out the sticks to see what they were. Then we did not know where they came from. Now I have a whole section marked 'mixed varieties' since they grow well but I have no clue what they are any more.
Once all your cloves are popped and ready you are all set to go down and plant them in your newly prepared bed.
FINALLY PLANTING YOUR GARLIC.
The bed is prepared, you have spent yesterday or earlier this day popping your bulbs into cloves now you are ready to plant.
1. Punching holes in the mulch. Once your mulch is in place you
need to create 'holes' or 'spaces' in which to plant the garlic. If you
are using a organic mulch like leaves and grass move the mulch aside to
create little holes down to the soil.
For plastic or fabric mulches a trowel, pair of scissors or even a blow
torch to burn holes is needed. Don't use a blow torch on thin plastic
row cover it will destroy the whole lot. Punch holes with a narrow trowel.
2. Spacing. Garlic does not need a lot of space. Make your holes around 6 inches (15cm) apart which will have the bulbs around 5 inches (12cm) apart once the small holes have been created. Rows can be the same width apart. Plant in opposite rows so each plant is in a zig zag from the one in the row beside it like this. /\/\/\/\. Where the top of each triangle is a garlic plant. A three foot bed can take four rows of garlic so if you are only growing for your family you really don't need a lot of space to get a lot of garlic crop in.
Its much easier to create all the spaces in the mulch before you begin to plant your cloves that way you can plant quickly without having to stop.
3. Planting. If you have prepared your bed correctly this is just a matter of pressing the clove into the soil so that it is deep enough to cover the clove. If your soil is still quite heavy you may need to use a dibbler tool or a thin bladed trowel to make a hole in the soil to plant the clove.
4. Plant the clove the correct way up. The bottom of the clove is the section that was attached to the whole bulb and the top is the small pointed section. If planted upside down cloves may not grow or they will be distorted trying to right themselves and get the shoots growing the right way up. Plant it so that the clove is just below the surface, pull the soil around and cover the clove and move on. There is no need to water garlic at this time. Usually there is enough rain to allow the garlic to start putting down roots. You don't want it to grow much top shoot until next spring so don't encourage it.
If you have more than one variety that you are planting make sure that you put labels at each end of the variety section so you can differentiate them when its time to harvest. Now your garlic is planted, there is nothing more to do until next year when you will need to weed out the small holes you created and watch your garlic grow.
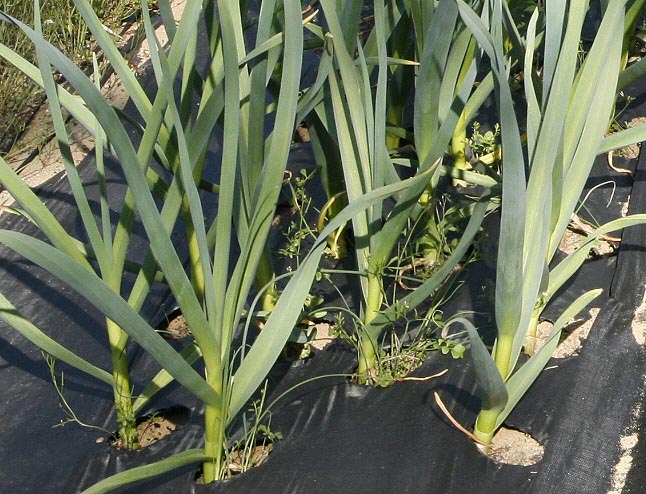
SPRINGTIME GARLIC.
Garlic grows fast once the spring arrives it just needs weeding and watering.
WATERING.
Garlic needs a fair amount of water during the early spring and summer,
but watering should be reduced once the garlic bulbs begin to swell and
the scapes appear. Still water but water less so it just moist or even
slightly dry, but do not allow it dry out completely. Too much water on
mature garlic cloves can cause them to mold and rot.
GARLIC SCAPES.
As your garlic grows towards summer it will put up a long stem with some
kind of teardrop shaped piece at the top but it might be round. This is
the 'flower' stalk. Its not really its more like miniature little bulbettes.
these can be planted later to create more garlic but will take several
years to become a garlic bulb which is why we all plant cloves instead.
Garlic does not really flower the bulbettes they produce will be the same
as the plant they are from. However they will differ from plant to plant
and its really the only way of telling that your garlic varieties are
different.
Some sources state you should remove this stem as it grows as the energy
put into creating the blubettes takes away from creating the garlic clove
you are interested in. We have experimented with removing and leaving
the stalk and so far have found no difference. So its up to you. Many
people remove the stalk and prepare the scape as a dip or salsa; or you
can leave it and eat the little bulbettes that come in fall its up to
you.
HARVESTING YOUR GARLIC.
Most sources state that garlic is ready to harvest when the lower three leaves of the plant have turned brown and withered. This seems to be a fair indicator, and usually occurs in the middle of the summer, July to August for zone 6.
Harvest garlic on a dry sunny day in the early morning. Try is possible not to harvest after heavy rain. If heavy rain is forecast at a time when you intend to harvest your garlic, get out and do the job before the rain arrives. Too much water on mature garlic cloves can cause them to rot and mold.
Gently loosen the garlic bulb from the soil and pull or gently dig it
from the ground. Shake off as much soil as possible and place the garlic
gently on a harvest sheet - usually a tarpaulin, or stack upright in a
plastic tote. Be careful with the cloves move them around gently do not
throw them down they can be easily bruised at this time which will reduce
their storage life.
Do not allow the bulbs to sit in the sunshine either this can also cause
later storage problems.
Once all your garlic is harvested it needs to be cured. First the tall stalks are removed from the bulb leaving a stem of about 6 inches (15cm) in length and the roots are trimmed back. The bulbs can then either be spread out individually on wire racks or collected into small bunches and secured with wire, zip ties or rubber bands. The bunches are then hung from vertical racks of some kind in a cool dark building. Usually a garage, shed or barn to cure. The rack can be a simple piece of wood that you can tie bunches too or anything you can use to get airflow around the bulbs. If using your garage do not place the drying bulbs anywhere near where the exhaust from a car would touch it. This would contaminate your crop and you really don't want to be eating exhaust fumes. Make sure you remember to label each bunch as to what variety it is.
Garlic should be cured for at least a month before it is removed from the rack and stored in a cool dry place. At this time we usually cut our stalks down to the bulb size, remove the outer paper layer which will remove most of the dirt and store them in brown paper bags. Lunch bags are excellent for this.
At this point its up to you how you store them. We usually begin placing our garlic in the refrigerator after about two months so it keeps better. Most of it will keep for 6-8 months before it begins to dry out a little and much is still useful if maybe a little dry by time the next harvest is due.
| Janice Hazeldine PhD is the owner and head grower of Floral Encounters an organic Medicinal Herb farm that is also a designated sanctuary for pollinators. |