


PREPARING A BED TO GROW GARLIC
DECIDING WHERE TO PLANT YOUR GARLIC.
Location is important. Your garlic needs to have full sun especially in northern areas, in zones below 7b some afternoon shade is recommended to stop the tops scorching in the heat. Garlic needs a good rich soil to do well in so good bed preparation is very important. Adding a lot of organic material is essential for good garlic growth.
PREPARING THE GROUND/SOIL.
I will explain how to do this in your own garden but photos will be from our farm, which does things on a slightly larger scale. So adapt everything for your own spot.
1. Clear the bed. I often use the bed where I had one of our yin yang bean beds, but it
could just as easily follow holy basil or some other annual herb. |
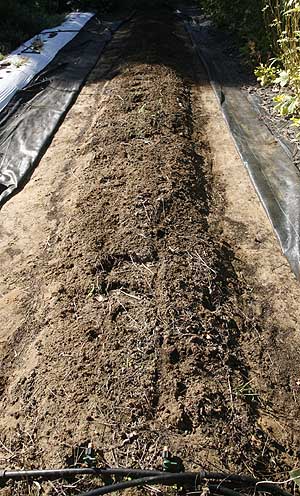 Bed cleaned of all weeds and debris |
|
2. Remove any watering lines, soaker hoses or other methods of watering so you can have clear ground to begin with. 3. Create your row. A bed three feet wide (1m) is often best to use for garlic, or any other crop. This means you can have two rows of crops with aisles each side that you use to tend the bed. This way you only work the soil in the area where the crop is to be planted and keep the aisles free. Some people say they can work 4 foot (1.2m) beds or even 6 foot (1.8m) but I find this is too wide and ends up with treading on the soil. Three foot seems ideal for all people. Creating your growing beds this way cuts down costs on compost and makes the soil easier to work. Choose how long you want the bed to be and mark it off. |
|
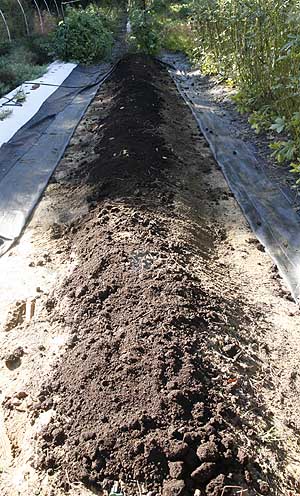 Compost added, about 2" (2.5cm) |
4. Add more compost! There can never be enough rich soil for garlic. Even if you had added some in the spring for the crop that went before the garlic, add more now. The earlier crop will have removed nutrients from the soil and added its own items back. Usually about 1-2 inches (2.5-5cm) of compost spread on the surface is sufficient for a good garlic crop but this will depend on how poor your soil was to begin with. If the soil has never had compost before you may need up to four inches. If you don't make your own compost, which if you are a gardener you really should do, its quick easy and free. Make sure you get a good screened mix. If possible get one from a local dealer that has been heat treated first to kill off any pathogens which you do not want to add to your garden. Compost can be purchased in bags from most big box garden stores or local garden centers and may be available loose depending on your area. We do not recommend using municipal waste compost because you don't know what is in the mix. This compost has been created from leaves and other debris that the county or township has collected from homes in your area. You have no idea what those home owners have put on their gardens! You don't want any bad chemicals or other problems entering your garden. If your neighbours also want compost you may be able to arrange with a compost firm to deliver a whole truckload and share it amongst several homes. This is the most economic way to purchase it. If there is too much leaving it in a pile ready for spring crops is perfectly acceptable. All farms do this. |
|
5. Rake it down. Spread the desired compost evenly across the ground. Then Rake it down along the row so that it is evenly distributed. |
|
| 6. Dig the compost into the soil. The objective is to incorporate
all the compost into the soil to increase the organic material and help
build better soil structure. This may be done by hand with spade if the
bed is small or if you have energy and enthusiasm or you can use a Rototiller.
A small light one is usually enough but it can be a little tough as rototillers
are designed as a 'walk behind' machine but you really don't want to walk
on the bed that you have tilled. The soil needs to be as fluffy and aerated
as possible. Never tread on the soil that you have tilled it defeats the
object of tilling it. This is why we use beds three feet wide. |
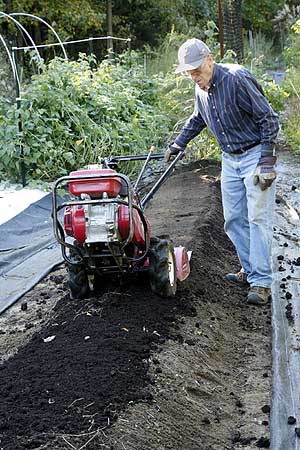 Using a rototiller to dig in compost, walk beside the tiller to ensure soil is not compacted |
|
7. Tidy the row. Once the digging has been accomplished a little tidying may be needed along the edges if any of the compost rolled off during the tilling or digging process. If dug by hand you will need to rake the soil down to create a even straight flat bed it should be flat on top of a slightly raised bed of soil. 8. Replace watering. Once the row is completed any irrigation lines may be replaced if you use them. If you use soaker hoses take this into account but they don't need to be laid down until after the spring freeze has gone. |
|
9. Mulching. Putting a layer of something over the soil is essential
when growing garlic, or any other winter sown plant. First it helps to
prevent soil erosion over the winter months. Bare soil is open to the
elements and can be eroded by rain, wind and frost. If you soil is light
a bad winter could easily remove half an inch or more. Not desirable.
The mulch also keeps the soil warmer like a little blanket that helps
the garlic bulbs through the winter months. Then come spring it helps
prevent weeds from growing and since garlic does not beat out weeds and
is planted fairly close together it can be quite time consuming to pull
weeds until its ready to harvest. Mulch helps with this. It also helps
to keep the soil moist, preventing water from evaporating and keeps warmer
during the early parts of the year. If you live in a very hot area using
a black colored mulch of any kind is not recommended as it can heat the
soil too much and cause the garlic to bolt early or even wither. If you
must use a black plastic mulch of some kind you may want to cover it with
grass cuttings to keep the heat down. |
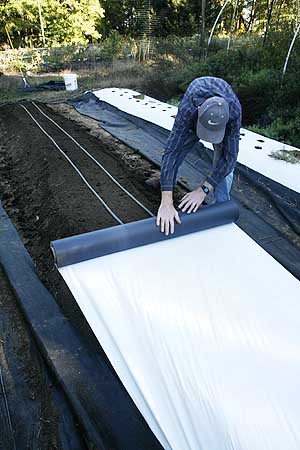 Adding plastic mulch to the bed. |
See our article on mulches for more detailed info and options.
Whatever mulch you choose put it down now before you plant your garlic crop.
Now you are ready to plant your garlic.
| Janice Hazeldine PhD is the owner and head grower of Floral Encounters an organic Medicinal Herb farm that is also a designated sanctuary for pollinators. |